Appearance
How to set Initial Media for Workflows (Image-to-Image, Image-to-Video, etc) BitVector-specific
Just for Workflows, not Skills... yet.
Note, this only applies to using Workflows directly. Skills right now don't have a way to use an external source of media.
However, what you can do for Skills is just say something like "Animate my last image" and that should work.
Some Workflows require a starting point reference, such as animate, upscale, or edit Workflows. In some cases, they may even require two reference points too!
WARNING
This is probably obvious, but just in case... Keep in mind that any media that you use as reference points will be:
- Visible to Graydient
- And if you're using Vector on Discord, then Discord will see it too
When using external media, please be cautious and use said media responsibly!
We support providing these, though the method of how you do so will vary depending on whether you're using our Discord bot (Vector) or Spyglass. You're in luck though, we've got instructions for both! Let's start with Discord:
Setting Initial Media on Discord
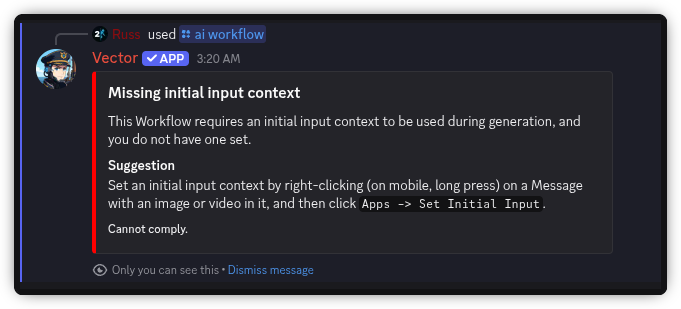
Vector will typically warn you if you try to run a Workflow that requires a starting reference point but you haven't set one - in some cases Vector might not catch it though.
TL;DR Quick Summary
There's a lot of instructions here on this page! We recommend you read the full set of instructions (and you should if this summary doesn't make any sense), however...
- To do a "reply to image" equivalent, DM
@Vectorand send your image/video as a new message attachment and send it unless its from a recent render, then right click (long press on mobile) and pressApps -> Vector -> Set Initial Input. - To do a
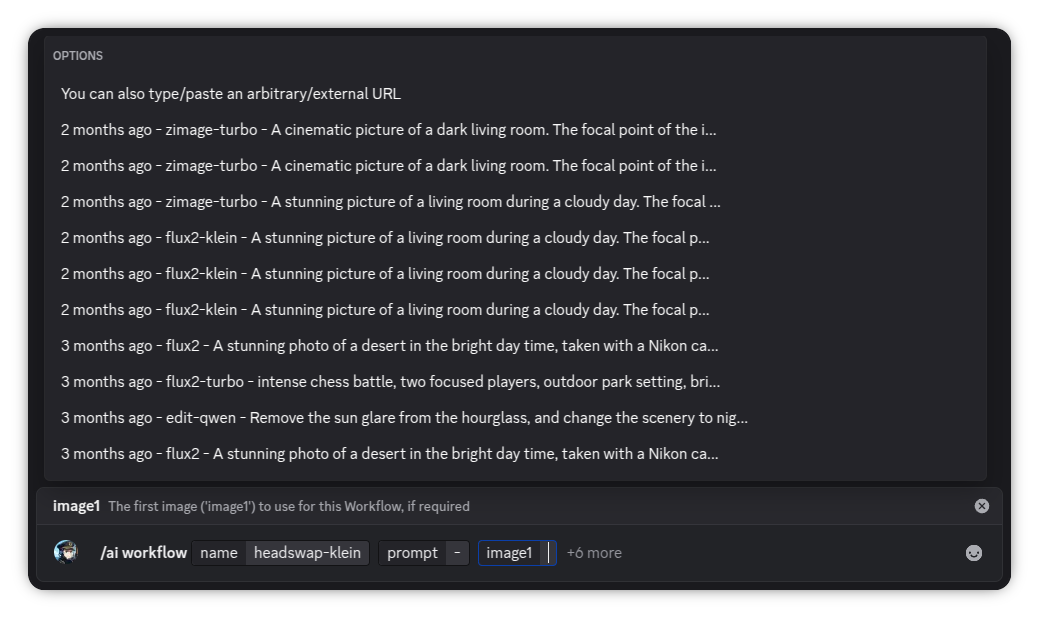
/control /new:name&/image1:name(or/image2:name) equivalent, pass a direct image link in theimage1(and where necessary)image2parameters to the/ai workflowcommand. - This is far easier to do on Spyglass since we have full control over the page design. So simple in fact, that you probably don't even really need a guide! I'd personally recommend Spyglass for these, especially if you're using the Workflows that need two or three reference images.
Workflows that only require one reference starting point
TIP
This works for both images and videos! Specifically, this method is the PirateDiffusion Telegram equivalent of "Replying" to an image with a Workflow command.
For these, the process is quite simple! You can either:
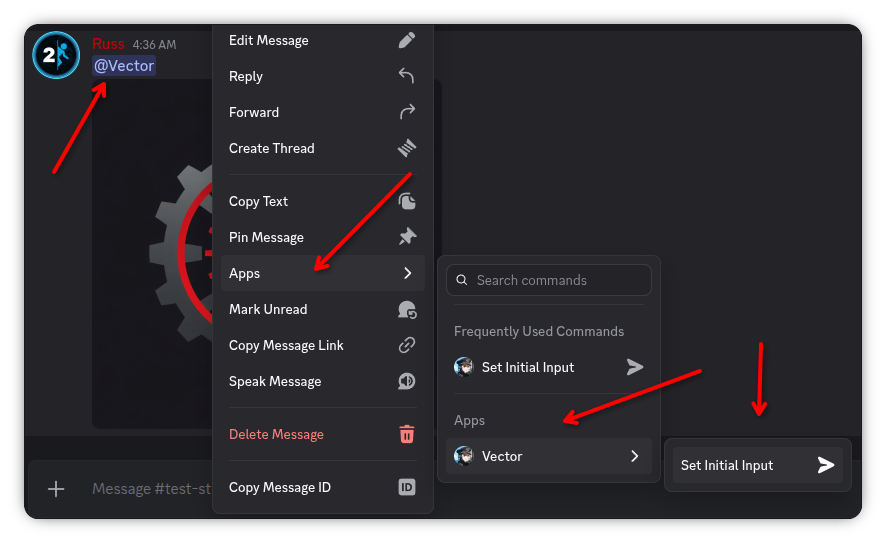
- Upload a custom image/video to use as a reference point, and ping
@Vectorin the message that you send it in, then right click the message (or on mobile, long press the message) and pressApps -> Vector -> Set Initial Input. This can be done wherever Vector is at, such as your DM with Vector!- Vector will react to the message with a 📸 icon as confirmation. This is done as a safety feature, please be responsible when using externally uploaded images!
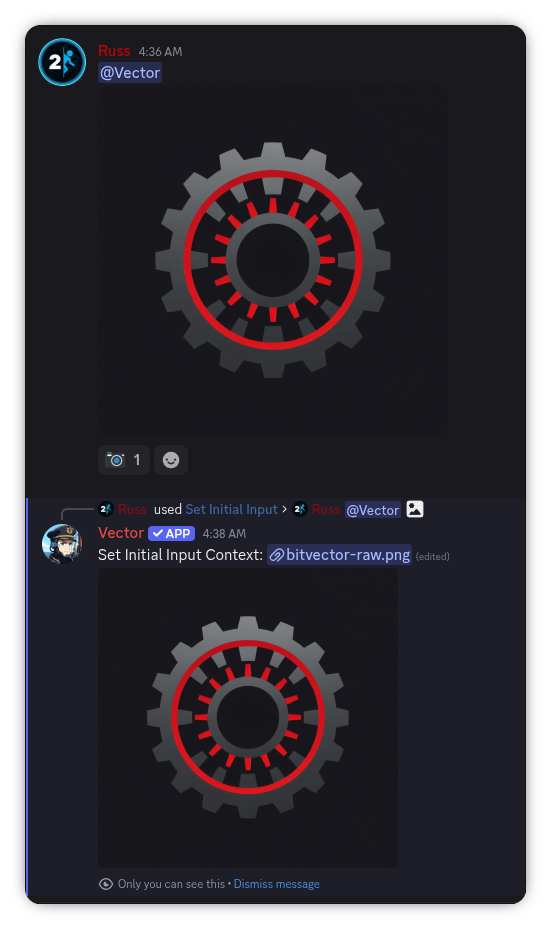
- Alternatively, if the reference point you want to use is a previous Render you generated, do the same process as above to run the
Set Initial InputMessage command, you just get to skip the "Attach image as new message" part. Presto!- Vector won't react to these with the camera emote, but will still tell you as a "hidden" message that he received it (only you will see that message).
If the Workflow requires two reference points, see the this section below!
Did Vector say that no media was detected? Check out this troubleshooting section!
Tips:
- If you do this in a DM with Vector, you do not need to ping him. It'll still work if you do though! Anywhere else though (such as in your own server, or in the BitVector server), you'll still need to ping him.
- When running this command on a messsage that has multiple media in it, Vector will ask you to confirm which one you want to use via a dropdown menu. Be sure to select one, otherwise you'll continue to get the "You don't have an initial context set" warning!
- Bonus fun tip: This works for gifs that are sent via Discord's Giphy selector too! It's quite fun to use an
extendWorkflow on one of these, or to just simply upscale one!- However, for this to work you must send the gif within your DM with Vector, as Discord's gif selector tool doesn't let you send the
@Vectorping in the same message. Since a ping isn't required in your DM with Vector, that isn't an issue there. - The Discord App doesn't show the gif button in DMs, but you can use the
/gifcommand to search for one, and when you select & send one, Vector can still pick it up.
- However, for this to work you must send the gif within your DM with Vector, as Discord's gif selector tool doesn't let you send the
Why do I have to ping Vector?
This is due to a security feature directly from Discord actually. By default, Bots (or "Apps" as Discord has started calling them) cannot "see" the contents of a message (so that is, the text, and any attachments) unless one of these conditions are met:
- The bot was pinged in the message
- The bot sent the message itself
- Someone runs a Message command on the message (this check seems to be broken though, sadly)
- The message is in a DM with the bot
- The bot developer has the "Message Content" Intent (special permission) enabled
That last one is tricky. Technically right now we could enable that special permission. However, once a bot is in 100 or more servers, the permission requires approval from Discord staff to have it active. But, you cannot request approval until the bot is in at least 75 servers. So while we could enable the permission now, we'd have to then disable it as Vector gets more popular, and hope Discord approves it. In that timeframe, then everyone would have to be taught to ping Vector, and so it makes more sense to teach everyone to do that now and then if/when the permission is approved, it won't be necessary (but it will also still work).
Vector says he didn't detect any media
99% of the time, that means that you didn't ping @Vector in the message where you sent the media. If you don't do this (unless you're in a DM with Vector, or if he sent the message - such as a previous results message), then to Vector the message is just blank. He detects that there is a message, but with nothing in it. That's a Discord security feature, for the extended details expand the note above!
Additionally, while Vector can technically "pull" media from URLs (this is why the gif thing works, in DMs), that will only work if it is a direct link to a media file. In other words, if when you open the link in your browser, it must only have the media and nothing else. It can't be "embedded" on a page. It also can't be a page that requires authentication / needs you to login (since Vector cannot login as you). It also can't be geo-blocked, on an IP whitelist, etc. Thus, usually its easier to just attach the file directly rather than relying on Vector's URL scanning. You can try, though (we promise it won't hurt him)!
Workflows that require two reference starting points
Equivalent Exchange...
The following process is the equivalent of doing /upload /new:name then /wf /run:... /image1:name on the PirateDiffusion Telegram bot
Some Workflows, like the various swap or blend Workflows actually require two (or three) reference images.
This process is slightly trickier, as we're still building out the UX for this. In the mean time, it can still be done though! Additionally, this will also work for Workflows that require three reference images. There's only a couple of them, they're quite rare!
Didn't you just say...
In the last section, we mentioned that it was easier to use a file attachment rather than a link. For this, you do need a direct link. I know, it seems contradictory, and we're working on making this work with attachments too! OR if you are wanting to just use a recent Render, you can skip grabbing the link as Vector can provide it for you.
For this, you'll need a direct URL to the image (I don't believe we have any Workflows that use a video as a second input), unless said image is a recent Render (you can still provide a direct URL if its an old Render). If you don't already have one, you can still send the image as an attachment to a message in Discord (you don't need to ping Vector for this, and in fact, Vector doesn't need to be "present" where you do this) but then you'll need to right click (long press on mobile) and click Copy Link (NOT Copy Message Link - thanks Discord for giving them similar names!), then that will give you the direct link that you'll need for the next step.
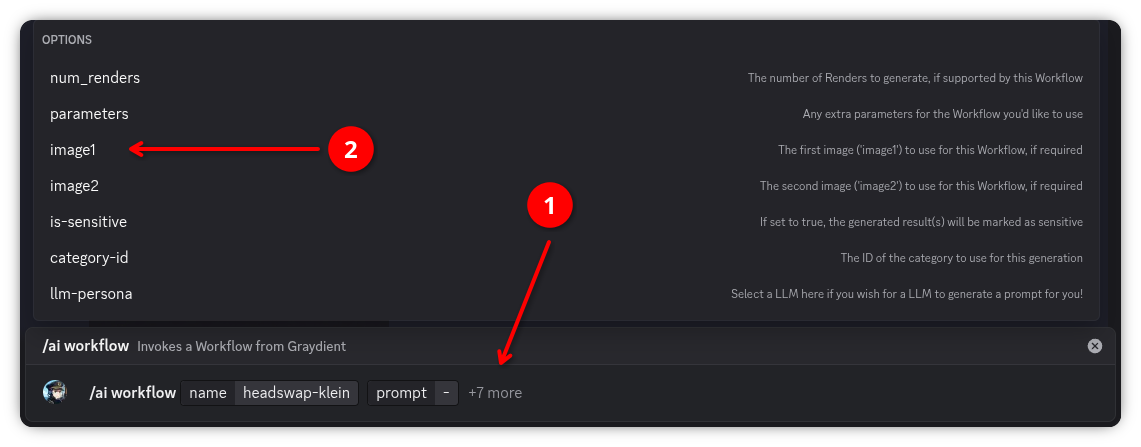
In the /ai workflow command, there is an optional parameter called image1 (and image2 for the rare Workflows that require a third image), you'll then put that direct link into that parameter (and nothing else). Of course, select your Workflow and provide a prompt if necessary (if it doesn't require a prompt, you can just use - to get around Discord's "this parameter is required" restriction, Vector will silently blank it out before he sends the request), then send the command.
Note, if you are just wanting to use a previous Render as the second (or third) reference point, Vector will autocomplete your last handful of Renders sorted by relative timestamps. You can click any of those options and Vector will grab the URL for you before sending the request.
(Don't try to send it with the You can also type/paste... option, that will fail...)
Order matters!
Most of these Workflows will need these images in a specific order, and that will be noted in the Workflow's description. Those descriptions usually use Telegram instructions, so just to note:
- When the description references "replying" to an image, that is the equivalent of our
Set Initial InputMessage command, use the first section for setting this. - When it refers to a control/upload like
/control /new:name(or the new/upload /new:nameversion) followed by/image1:name(or/image2:name) that is what thisimage1andimage2parameters are setting. This can sometimes be referenced as a "source" image. - Even more confusingly, some Workflows might not even use that "reply" feature - and instead will want you to specifically use
image1andimage2. That's definitely confusing, and unfortunately there's not really anything we can use to "unify" all of them without causing breakages. The key is to read the Workflow's description, and note the first two bullet points as how to do the equivalent operation.
If you mix them up, you'll usually get unexpected / reversed results.
Setting Initial Media on Spyglass
Spyglass has a huge advantage here, because we're able to fully design the UI ourselves, and thus can do things like show you the relevant fields when they're specifically needed by a selected Workflow and such. I'd say it is intuitive enough that you probably won't even need this guide! This section of the article looks a bit long, since I like to be really thorough, but as mentioned, you probably don't actually need to read this.
Since I provided a quick summary in the Discord section, I'll do the same for the Spyglass section here:
- Select a Workflow that needs an initial image/video reference
- Press the picture frame/video icon button next to select a recent Render
- Or press the "Up" arrow icon button to upload your own external file
- Then just run the request as normal (of course, provide a prompt if the Workflow needs one)
WARNING
Unlike Vector, Spyglass will happily let you send a request without specifying initial media, and doing so will just cause a generic failure error after the request processes on Graydient's side - that's on our todo list to fix though!
Like Vector, Spyglass will let you use any of three sources as a initial reference source:
- A direct link
- A recent Render
- An external upload
(Technically, Spyglass & Vector just turn the last two into a direct link "behind the scenes" for you, before sending off the request)
When you have a Workflow selected that uses initial media reference sources, it will automatically display the necessary UI elements to provide these. Specifically, for the "Reply to Image/Video" equivalent on Telegram, Spyglass calls it "Target Image/Video URL" and it always appears under a dedicated section called "Input Media", like this:
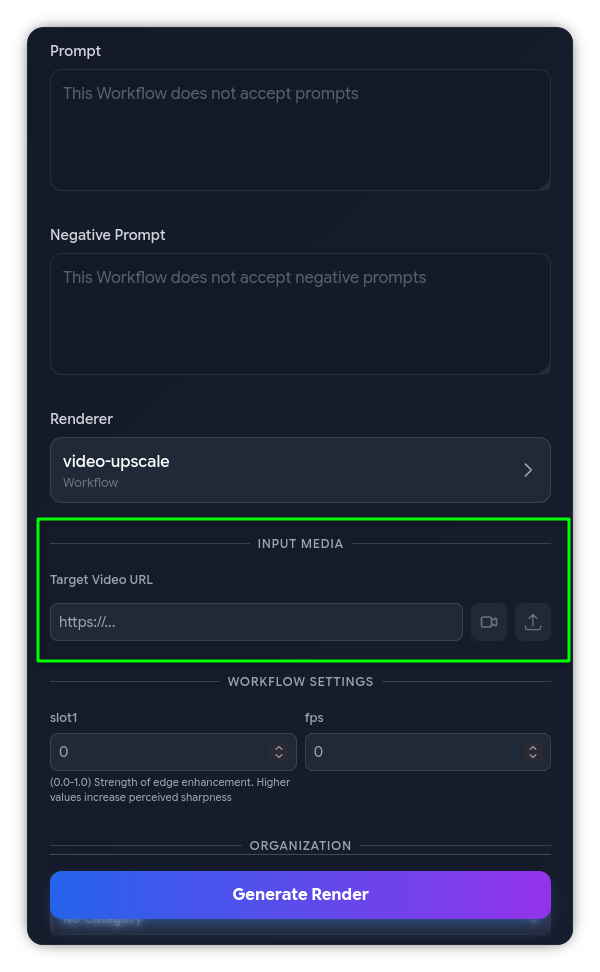
Of course, if you want to use a direct link, just paste said link into the text field. You'll know if its actually a direct link, because Spyglass will show a preview of the image/video after you do so (and it will show a fail message if its not valid). There are two buttons next to those however, the first button (either a picture frame or a video camera icon) lets you select a recent Render as the source. The second button (which looks like a little upload / up-arrow icon) brings up a dialog to upload your own external image/video. Additionally, any images/videos you upload will be saved for 60 days (this duration is subject to change at any time) and those will also appear in that dialog! Don't worry, you can delete them at any time from that menu too.
Spyglass is smart!
Note that Spyglass will automatically filter out sources to whichever is relevant for that Workflow. That is, if the Workflow needs a reference image then it will only show you images, and vice-versa. The exception is if you manually paste a link, then it won't check this for you.
So, if you're trying to select an image yet you don't see any, be sure that the Workflow you've selected actually supports images. You might've accidentally for example selected a video upscale Workflow instead of an image one!
Spyglass also changes the icon & text to match too!
No matter which source you've chosen to use, after you select it, Spyglass will both show you a preview of said media, and will also populate the text field with the actual backing link to that media too. Once it does, you're all set to proceed as normal!
Advanced Tip for Mobile Users
If you've installed Spyglass as a Progressive Web App on either Android or iOS (in which case Spyglass will show up as an actual "app" on your home screen/launcher), then you can use the "Share" feature of your OS to send an image/video to Spyglass. When you do so, Spyglass will automatically open and will ask you to confirm saving said file as an Upload.
Not sure what any of that means? Ignore it for now, we need a dedicated page for Progressive Web Apps - its a great way to level up your usage of Spyglass!
What about Workflows that require multiple reference sources?
The process is actually exactly the same! Spyglass will just show an extra image1 and/or image2 field with the same two extra buttons for using a recent Render/Upload.
Told you it was simple!
What is init_image_url?
Spyglass is supposed to filter out fields that you're not intended to touch. These fields appear in the API, but you're not actually supposed to set them yourself.
Every now and then Spyglass will think it is supposed to show a field called init_image_url (or init_image_filename). If you see that field, just ignore it. You'll know that it is supposed to be ignored because Spyglass won't show you the two extra buttons that we talked about above.
This applies really to any Workflow field that "looks weird". The only "weird" ones that you might be interested in are ones that are called slotX (with X being a number), those are intended to be modified by you if you want. If the Workflow author provided a description for those, then Spyglass will show it - older Workflows might not have these and will instead have it in the actual Workflow description card instead (on the little i button).