Appearance
Starter Model / Workflow Recommendations Platform agnostic
Just getting started with the Graydient platform? Here are some recommendations on some options to try!
INFO
Most of these recommendations will be tailored to generating "realistic" content, some of these may work with more anime-style content, but aren't considered their strong points.
Everyone can benefit from these!
This page, while may contain some BitVector-specific notes, are actually quite "generic". Regardless of which method you're using Graydient's services, these tips and notes are a great resource for all! They're intended to be a "Starting with Graydient's services" more than they are "Using BitVector's platform" set of notes!
Workflows
Notes about Workflows + Prompting (Click to open)
The mentioned Workflows here are, for the sake of keeping it simple, "Next Gen" tech. They work best with natural-language based prompts, and the more details you can provide, the better they will perform.
One of the best ways to think about writing a prompt for these is to try to picture the final result that you're looking for in your mind, then "describe" that result as if you were describing it to someone whose visually impaired (or just talking to them on the phone, though most people in that case nowadays would just text the image so...).
Your prompts don't need to be novels (nor as long as this tip-block 😉), but try to shoot for a prompt that is more than a couple of sentences. Describe your main subject, a bit of the environment, and the lighting! For video based Workflows, try to also describe the actions of the subject(s) and the movement of the camera (if it is supposed to not move, then try "fixed position shot"). Doing even just that will drastically increase the quality of the output from these Workflows.
Prompting could have its own dedicated section, but I'd recommend joining the Graydient VIP & Support group on Telegram - you can find the link in your Graydient account portal. One of our resident prompt experts, Mark, has a dedicated channel ("Prompting Tips & Discussion") to posting an amazing and constant stream of prompt tips!
Images
Here are some fantastic Workflows to get you started with creating some nice looking images! There will be some (collapsed by default) extra notes about these Workflows below each entry.
zimage-turbo: Z-Image is one of the more popular Workflows - not even in just the Graydient community either! Z-Image has been quite the hit with the broader Stable Diffusion community. Not only does Z-Image have great "prompt adherence", it is also a very fast Workflow. Fast enough that it even supports the/imagesparameter to let you create multiple images (a "batch") in one request!
Z-Image Details
- Z-Image has also proliferated very well in the LoRA community, so you'll find a ton of them available too!
- Z-Image (the turbo edition, as the main version hasn't been released by the model developers) uses a default guidance of
1. While the intricacies of this doesn't matter too much, it does mean that negative prompts will be ignored due to how that mechanism works. However, Z-Image is pretty good about not including too much "noise"/randomness and as such the lack of a negative prompt isn't a big factor in most cases.
flux2-klein: This is a lighter form of the fullFlux2, which was in turn the next iteration of the previously popularfluxmodel, Flux.2 is an extremely powerful model, but the tradeoff is how "heavy" it is. I'd recommend giving Flux2-Klein a go, as it is quite liked by the community and requires far less GPU resources as the full Flux 2 model, and is also faster.
Flux.2 Klein Details
- One of the things I enjoy about Flux 2 is the lighting it tends to use by default (if you don't specify your own), the results are usually quite stunning even if your prompt is on the simpler side. Though, this comes at the side effect of the images having a higher "AI generated look" to it. Flux has a reputation for "Plastic like skin" when humans are involved in the image, and while Flux 2 (and the Klein version) somewhat tones this down, it may still be present.
- Due to the architecture differences that Flux 2 Klein has from both Flux 1 and Flux 2 (Full), LoRAs for either of those will not work.
qwen: Qwen comes in two forms! Qwen can be used to generate brand new images from a prompt (we call this "Text-to-Image") or you can use it to edit existing images via a prompt ("Image-to-Image") with theedit-qwenworkflow!
Qwen Details
- Qwen does a pretty good job of being able to generate both realistic images, and more animated/comic/fantasy style images.
- The
edit-qwenWorkflow to edit images is one of the better image-editing Workflows as of the current writing- In comparison, there are also edit models for Flux 1 and Flux 2 (
edit-fluxandedit-flux2respectively).
- In comparison, there are also edit models for Flux 1 and Flux 2 (
chroma1-flash: This one might seem like an "odd" pick to veteran users, but I find that Chroma is a bit of a "diamond in the rough". Chroma is a very heavy fine-tune (effectively a derivative) of Flux 1. Their goal was to basically take the architecture of Flux (which was one of the first of the "Next gen" models) and add back some stuff that was either removed, or intentionally not included in Flux's training dataset. Or to put it more briefly, they wanted an uncensored version of Flux.- The "Flash" name indicates that it is faster, and needs less "steps" - much like
zimage-turbolisted above. This workflow in particular uses a finetune version of Chroma that doesn't need as extensive prompts as normal Chroma, and thus I tend to recommend it for realism photos.
- The "Flash" name indicates that it is faster, and needs less "steps" - much like
Chroma1-Flash details
- Chroma1-Flash uses a finetune of Chroma1-HD (which is a derivative of Flux!) and has a low-step LoRA baked into it. This means that it needs far less steps to generate a good image quickly.
- It tends to favor more "professional" style images, but you can prompt it to generate more "casual" or "amateur" style images. For example, try
A selfie photo of a person with a funny hat. - Based on the latest version of Chroma ("Chroma-1 HD") which was trained on images that were at a 1024x1024 resolution, which allows for Chroma to create higher native resolution images without breaking down. That makes it upscale pretty well too!
- While this finetune doesn't require nearly as extensive of a prompt as "normal" Chroma1-HD, the more detailed your prompt, the better!
- This finetune by default uses a CFG / "Guidance" of 1. Whenever a model runs with CFG=1, negative prompts are ignored and have no effect (they quite literally just don't get processed).
- You may override this if you want, but this will increase the generation time, thus should be used sparingly. In most cases, you really don't need to adjust this.
- Chroma can also do anime/illustration style images, though it doesn't focus on it. Try prepending your prompt with
An anime style illustration of...to test this.
Videos
Similar to creating images, there are numerous different Workflows available for creating videos! There however is less variety in available video models/Workflows due to the higher complexities required to create them.
Video length / resolution / framerate limitations
Video models require a much larger amount of resources to generate with. Remember that Workflows can only run for a max of three minutes before timing out. Since video generation takes longer, you won't be able to create 30 second videos at 1080p (something like this would, depending on the available hardware, take ~30+ minutes - far exceeding the 3 minute timeout).
But, you are welcome to play around with the settings to see where you can push it, and we do have multiple video upscale Workflows to improve the final results. Additionally there are "extend" workflows that let you attempt to "add on" to a given video, allowing you to "chain them together" - then upscale that!
The first thing to note is that there are two approaches you can take to create videos, we identify these by their "input to output" names, for videos that is:
- Text-to-Video (These Workflow names start with
video-) - Image-to-Video (These Workflow names start with
animate-) - (And technically, there is also Video-to-Video as well, I'll touch on that at the end)
Text-to-Video Workflows generate videos primarily based off the prompt that you provide and in fact, the prompt is the only thing you provide for these, aside from a few potential settings that you can tweak.
In comparison, Image-to-Video Workflows generate videos by using an image you provide as a starting point for the video. The image you use will be the first frame of the video, and the model will attempt to extrapolate what the rest of the video should look like based off the prompt that you provide. So, you still need to provide a prompt, but a big portion of the video's "looks" are influenced by the starting image instead.
Setting the "Starting Point" for Image-to-Video / Animate Workflows
When using Image-to-Video Workflows (or any Workflow that requires "something to start with", such as upscale Workflows) you can set the starting Image/Video in both Discord and Spyglass:
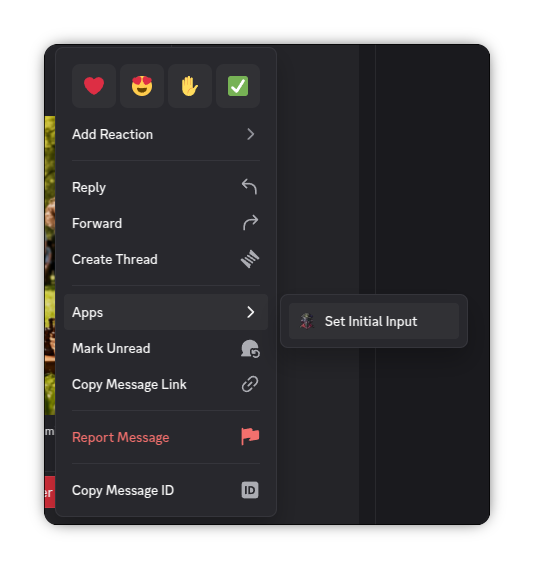
Discord: Right click (Long press on mobile) a message with an image/video -> Press Apps -> Press Set Initial Input
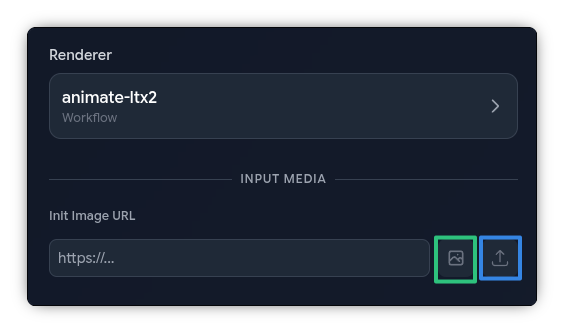
Spyglass: After selecting a Workflow that requires one of these, press the image/video icon (green box below) next to Init Image (or Init Video) to select from a previous Render, or press the "Up" icon (blue box below) to upload an external image/video
Here are some video Workflows to get you started:
TIP
Note: Text-to-Video generation does require writing out a decent prompt, and its important to describe not only the environment (to some extent), but any involved characters, what they are doing, what they look like, background scenery, etc.
However, with Image-to-Video ("animate" Workflows), the level of prompting is a bit easier because you can typically get away with describing just the movement / action since most of the details from the initial image will be inherited. Though, the more details you can get into the prompt, the better! Just be sure to not try to describe the initial image (and details from it), as that will confuse the model.
In general keep in mind that video generation tech is much newer than image generation tech. Try not to be discouraged with your initial results, but also set proper expectations - you're not going to be able to generate an IMAX movie using these models.
Wan-based Workflows
Regarding audio...
Wan, and most video model archetypes outside of LTX2 do not generate audio. They only generate the "visual" component of a video.
video-wan22: The Wan architecture of models has a lot of community popularity behind it, the resource usage can certainly get high - but it still fits within most consumer-grade hardware.
Text-to-Video Wan 2.2 Details
- With the amount of popularity behind it, there are a ton of LoRAs available for Wan - though these tend to be more NSFW themed.
- There is also
video-wan22-experimentalandvideo-smoothwan22. These are both still based off of Wan 2.2, but have some other tweaks to the Workflow and baked-in LoRAs to try to improve the results. Give all three of them a try! - These Workflows support a
length,fps, andsizeparameter for tweaking. Feel free to adjust these to see what you can get!lengthis the total amount of frames in the video. To determine how long the video will be, take thelengthand divide it byfps. For example, 128 frames at the default 16 FPS will give you an 8 second video.- If you push the
lengthtoo far (~135 is about the limit), the model will usually create a loop effect on the video, where it'll render the end of the video in reverse. Use theextend-wan22to create longer videos without this effect. - Regarding
fps, keep in mind that the upscale Workflows will usually increase/double the framerate of the video you provide it. Don't try to generate a "native" 60 FPS video, as that will usually take too long, causing a timeout error.
extend-wan22: This Workflow allows you to take a starting video (such as a previous video Render you've generated), and "extend" it - the underlying model will try to effectively "make the video longer". You'll need to prompt what the additional part of the video looks like, try to avoid including the previous parts of the video in your prompt.- There is also a
extend-smoothwan22Workflow too!
- There is also a
animate-wan22: This Workflow is the Image-to-Video equivalent ofvideo-wan22, that is, instead of generating the entire video and details based off the prompt, it'll derive most of the details from the initial image instead.- There are also equivalent
animate-wan22-experimental,animate-smoothwan22workflows as well - though theanimate-wan22-experimentalone is deprecated because the regularanimate-wan22Workflow has improved these days. Feel free to still give it a try though! - You can still use
extend-wan22with the results of theanimate-models!
- There are also equivalent
TIP
The animate-wan22* Workflows also support the same length, fps, and size parameters that were covered in the "Text-to-Video Wan 2.2 Details" info box as above!
LTX (-2) based Workflows
LTX-2 is a very new (at the time of this writing) video model, it is capable of generating video and audio (including voices). It requires really well written prompts, even more so than Wan - and there are still some weak points of LTX-2 as well.
LTX-2, being a very new archetype, is in this infancy stage where it is both very advance (such as being able to do audio) and can create some stunning visuals, but also can fall apart at random times. Some folks have noticed that physics get a little "wonky".
It is also a much heavier model, so you won't be able to get nearly as long videos with it, but as always, you're welcome to try to push the settings as high as you can get them!
INFO
There are also Workflows for the original LTX based models, though those will not be covered here as they are quite old.
video-ltx2: This is the normal "Text-to-Video" Workflow for LTX-2, all you have to do is provide a prompt that describes the video and any audio you wish to create. Be sure to provide vivid details for the best results!
animate-ltx2: This is the "Image-to-Video" Workflow for LTX-2 - you provide a starting image to use as the initial frame, and then LTX-2 will try to extrapolate from there based off of your prompt.
- Some people have noted that the Image-to-Video version of LTX-2 is more primitive than the regular Text-to-Video version - and then others claim the exact reverse. Definitely try both!
Post-processing Video Workflows
There are a couple of Workflows that you can use once you have your final video:
TIP
These are considered "Video-to-Video", so use the same "Starting Point" tip as above to make sure you're piping in the "source" to these Workflows! The "archetype" of the model you used to generate the videos doesn't matter, so whether you've used LTX(-2), Wan (2.1/2.2), or even Hunyuan - they will all work with these.
video-upscale: This Workflow is a basic upscaler Workflow, it will double the framerate of a video and bump the resolution up to 1Mpx (in other words, the video will look sharper)video-upscale-flashvsr: This one is similar to the basicvideo-upscalemodel, except it uses generative AI to try to fill in missing details. It'll also double the framerate and make the video look sharper.- Due to the generative aspect of it, if your video is already really detailed, you may want to just use the
video-upscaleregular Workflow instead.
- Due to the generative aspect of it, if your video is already really detailed, you may want to just use the
INFO
You do not need to provide a prompt to either of the above upscale Workflows
mmaudio: This Workflow can add a background audio track to a video. However, it cannot do voices, it is intended for audio like ambient noises and music.- This Workflow accepts a prompt, which is just the description of the audio track you want to try to generate.
- In theory, I'm sure this Workflow works with an LTX-2 video that already has audio, but I imagine the results will be quite wacky. Couldn't hurt to try it though!
audio-ltx2: A new one! This lets use leverage LTX-2's audio abilities to add a new audio track to an existing video!- The starting video does not need to be generated with LTX-2.
- The actual visuals behind the video does not get changed, adding voices might look a bit strange if the video doesn't already account for someone speaking.